
A good CPU cooler helps maintain the performance level of any system and also keeps the processor cool during prolonged usage. When you’re building any PC system, it is important that the CPU cooler is properly installed to make sure that heat is effectively dissipated. This helps it to maintain appropriate operating temperatures. You can easily mount your AIO liquid cooling without any other external guidance, all you need is your cooler manual and some online instructions and you’re good to go.
Looking for the best rated coolers on the market in 2026? Go for the highly rated Cooler Master Hyper 212 Black Edition or AMD Wraith Prism LED RGB Processor Cooler Fan from Ryzen.
Installing AIO Liquid Cooling Easy Step By Step Guide
1. Pre-Installation
The first thing you should do before installing any all-in-one cooler is to remove the previous cooler and mounting brackets, thereby making space for the new one. Also, make sure to wipe the area with a cleaning solution to rid it of any thermal grease traces. However, removing the brackets and cleaning the grease won’t be required if you’re building a new PC.
2. Installing the Backplate
Now that you have cleaned out and made space for the new all-in-one liquid cooler, your CPU is all set for the installation process. You can start by installing the backplate on the motherboard. In most PC cases, a window is included to provide quick access to the back of the motherboard. In case it’s not there, you will have to disassemble the PC and remove the motherboard to install the backplate.
If you’re building a new PC and plan on mounting an AIO cooler, you can install the backplate on the motherboard beforehand, so you don’t have to go through the hassle of assembling. Also, make sure to include a window in the PC case to reach the motherboard if required in the future.
3. Mounting the AIO Water Cooler
This is by far the easiest step in installing an AIO water cooler: the mounting process. This step consists of screwing the pump to the backplate using the bracket included in the packaging. Insert the bracket’s mounting points into the given holes and screw them firmly in place, while making sure that the pressure is quickly spread across the CPU surface.
4. Installing the Radiator Fans
Radiator fans come separately with the packaging, so you have to secure them to the radiator manually. You can install the fans on either side of the radiator, keeping in mind the airflow and available space in the case.
If you install the fans on the interior side, they will push the air out of the case to keep it cool. While if you install them on the opposite side of the radiator, they will work by pulling in cool air.
Additionally, if your PC case has extra space, you can install fans on both sides of the radiator for enhanced cooling performance.
Don’t forget to double-check the arrows indicating airflow on the fans to install them correctly. The last thing you want is your fan to push warm air back into the case.
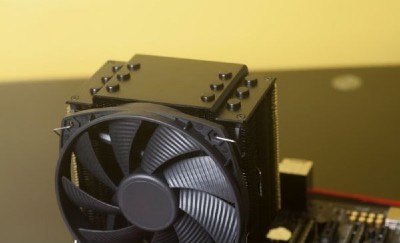
5. Installing the Radiator
Now that the fans are in place, it’s time to install the cooler inside your PC case. Most cases have built-in mounting points for the radiator. Place the radiator inside the case and then secure it using the screws provided with the packaging.
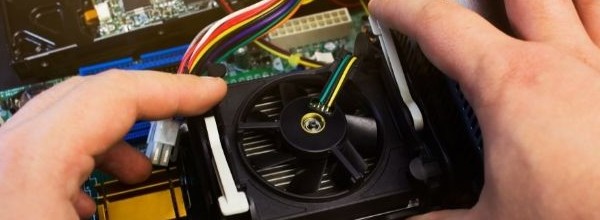
6. Connecting the Cables
Your pump and radiator are in place, so now it’s time to connect the power and control cables to the motherboard.
First, connect the power cable to the top of the pump. This cable has three connectors; the first 3-pin connects to the fan header on the motherboard.
You can plug the second Sata power connector into a suitable connector attached to the power supply. The third connector is for the radiator fans that you can slot into the 4-pin connector.
Second, connect the mini USB cable for LEDs between the pump and an internal USB 2.0 header on the motherboard.
7. Post-Installation
Now that all the AIO cooler components are in place, it’s time to test if it is working fine or not. Before you start your system, check your BIOS to see whether the fan header settings follow the user manual.
After starting the system, make sure the fans are spinning and the pump is working. If you can hear a slight hum from the cooler, it means all is set and ready to use. This concludes our AIO water cooler installation process.
How To Install CPU Cooler AMD
AMD CPU coolers come in two forms: there are some that come with a retention clip and there are CPU coolers that come with spring-screws, AMD CPU coolers are much different from other CPU coolers when it comes to installation.
When installing an AMD CPU cooler with retention clips you have to ensure that the CPU is properly seated in the socket and if you are installing a new CPU cooler, it may already have thermal grease pre-applied on it.
In this case, you do not need to apply thermal grease to the CPU lid. All you have to do is to position the CPU cooler on the processor so that the retention clips on each side of the heatsink align with the socket mounting lugs on the retention frame on the motherboard, then carefully push down on the retention clips, one at a time, until both clips are hooked onto the socket mounting lugs.
You can then connect the fan power lead on the CPU cooler to the CPU fan header on the motherboard, you can refer back to your motherboard user manual for the CPU fan header location.
Installing an AMD CPU cooler with spring-screws can be a bit tricky if it is a new system build.

The motherboard may come with a retention frame preinstalled, all you have to do is to remove the retention frame from the motherboard by unscrewing the four screws holding it in place.
With the retention frame removed, ensure that the backplate remains in position with the holes on the motherboard.
And then use the manual provided by your motherboard an located where to install your cooler.
Looking for the AMD Cooler? Check out the highly rated AMD Wraith Prism LED RGB Processor Cooler Fan from Ryzen
How To Install CPU Coolers Intel
To mount the Intel stock cooler properly, place the motherboard on top of the foam or cardboard backing that was packed with the motherboard.
The stock cooler will come with paste pre-applied, it looks like three gray stripes. The 4 push pins should come in the proper position for installation, that is with the pins rotated in the direction of the arrow, (counter clockwise) as far as they can go.
If you want, play with the pushpin mechanism until you know how they work. Place the cooler so that all 4 pins are oriented over the holes in the motherboard.
Push down on the entire cooler so that all 4 pins are through the motherboard. When you push down on the top black pins, it expands the white plastic pins to fix the cooler in place.
How To Install Master CPU Coolers
Grab the actual cooler and place it upside down on your table with the sticker facing up. First remove the attached fan by simply unclipping it on the sides, this will allow you to better handle the cooler when it’s time to mount it.
Also, remove the sticker on the bottom, but avoid touching the surface underneath the sticker as you want to keep this area clean of any debris, oil from your hand, and so on. This is the area of the cooler that will directly come in contact with the CPU and thermal paste.
Grab the 2 attachments labeled ‘C’ in the manual but do not confuse it with the similar-looking ‘B’ brackets which are for Intel motherboards.
Doing this one at a time, place the attachment under the side of the cooler so that the small tiny indents are facing inwards towards the middle of the cooler (these indents are circled below).
Then, while holding the attachment in place with one hand, use your other hand to screw the attachment in place with your screwdriver using the tiny screws, these small screws are labeled ‘H’ in the manual.
Attach the “wing” to the cooler with the small indents (circled) facing inwards. Then screw it in and repeat for other wing
To confirm that you’ve attached these “wings” correctly and securely, after screwing them in on each side of the cooler, try to wiggle them up and down – you do NOT want it to be able to wiggle around.
If they do wiggle from your touch, unscrew the small screw and re-attach the wing so that it’s properly in place. You want these wings to be secure and not be able to move around.
Now before mounting the cooler, you need to add some thermal to the top of your CPU. Unlike some other coolers such as stock AMD coolers, the Cooler Master Hyper 212 RGB Black Edition, and any other variants of the Hyper 212, does NOT come with thermal paste already pre-applied. Therefore, you must apply the paste yourself, but this is extremely easy to do.
Get the paste that should have come included with the Hyper 212, and first remove the small lid. Then, while holding the tub of paste with two fingers, gently press down on the rear end of the tub to squeeze out the paste onto the middle of the CPU. You want to squeeze slowly until you have a small blob roughly the size of a green pea or a fraction larger.
Heatsink Installation: How To
Attach the fan to heat dissipator with screws, using spacers between, then attach the fan/dissipater to the chassis. Place special screw extenders into the mounting ring and apply thermal paste to the center of the CPU mounting position on the motherboard.
How To Mount Water Cooling PC FAQ
Does It Matter Which Way I Install My CPU Cooler?
Yes, it actually matters which way the cooler is facing, because you would want the airflow to be directed towards the back of the case.
What Is The Easiest CPU Cooler To Install
The deepcool 500 is the easiest CPU cooler to install because of its unrivaled compatibility. The AS500 delivers optimal performance and compatibility with a slim tower design for zero interference.
Best Way To Mount AIO Coolers?
There is no specific way to mount CPU coolers, it typically depends on the general position of the other components within the system.
Final Words About CPU Coolers Installation And Setup
So there you have it – a guideline on how to easily mount your AIO liquid CPU cooler or heatsink and compared Intel and Master cooler and given directions on how to install them properly.
If you’re looking for the best rated coolers on the market in 2026, get the highly rated Cooler Master Hyper 212 Black Edition or AMD Wraith Prism LED RGB Processor Cooler Fan from Ryzen. Let us know in the comments if you have any questions. Cheers
Table of Contents